Install and configure the eHSM Network Daemon to use the Hardware Security Module over a TLS connection
Use this how-to guide to configure and use the eHSM over the network.
Centralizing key management has several benefits. It can reduce costs, reduce risk of human errors, ease backup and restore procedures and help to manage key life cycles to name but a few. Furthermore, in a cloud environment, it is necessary to access the HSM over a network connection instead of USB because access to hardware is usually restricted.
While key material is always protected by the HSM, it is prudent to protect the login passwords using an industry standard TLS connection when authenticating with the HSM over a network.
In order to configure the TLS connection, a TLS certificate and CA certificate chain is required. Here we will explain how to use the ellipticSecure CA service to request a certificate - but it is also possible to use certificates from other vendors or your own CA infrastructure.
Use the cross platform eHSM Manager to request a TLS certificate
-
From the Tools menu, select “Request eHSM Daemon certificate”:
Fill in the required details and click “OK”
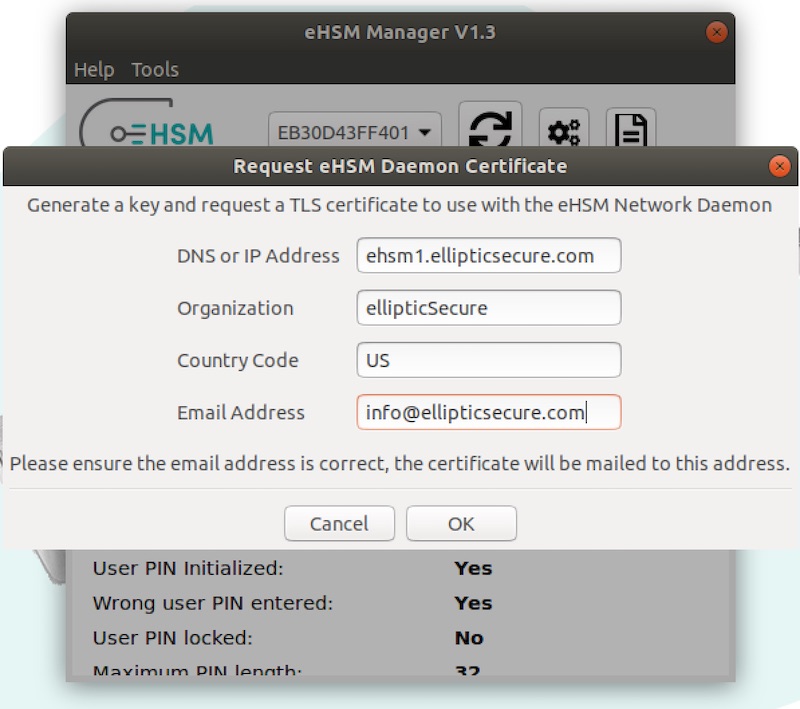
When the request is successful, you will be asked to save a .pem file - this is the key for the requested certificate. This key will be required later by the eHSM network daemon.
-
Save the certificate you receive by mail for later use by the eHSM network daemon.
-
Follow the service installation instructions for your server platform:
-
Configure the eHSM shared library to use the TLS transport.
The HSM will now be accessible over the network by eHSM shared library clients using the following ehsmconfig.json configuration file:
{
  "transport": {
    "address": "ehsm1.ellipticsecure.com",
    "port": 4433,
    "cacertbundle": "ca.pem"
  }
}
Copy this file into the same directory as the shared library/dll or process that is using the shared library.
Install the eHSM Network Daemon
-
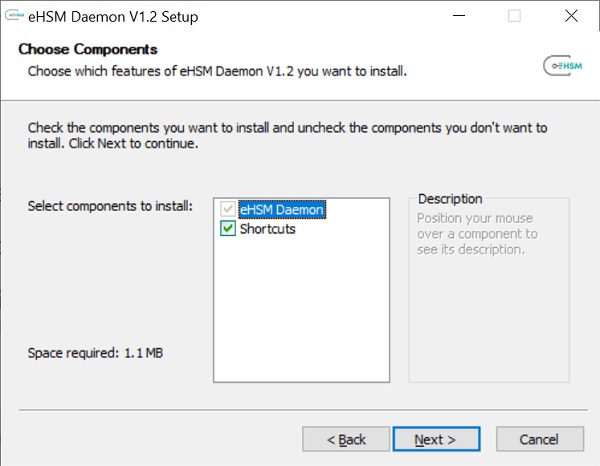
Download and install the eHSM Daemon for Windows
-
Once the install has completed, configure the service:
Copy the serial number from the eHSM Manager device information screen

Open an Admin command prompt, go to the installation folder and edit the ehsm-daemon.json configuration file. Replace the “devicesn” with the actual device serial number and ensure the ca, key, and server files are correct and matches the “bindaddress” field. The files installed with the service will work for localhost - for other domains request a new certificate with the correct domain name.
     {
       "device": "9E911E8A2992",
       "bindaddress": "ehsm1.ellipticsecure.com",
       "cafile": "ca.pem",
       "keyfile": "key.pem",
       "certfile": "server.pem",
       "port": "4433"
     }
Once you have configured the service, restart it (or use the Windows service manager gui to restart the service):
"c:\Program Files (x86)\ellipticSecure\eHSM Daemon\ehsm-daemon.exe" restart -
Open the configured port on the firewall if outside access is needed.
Install the eHSM Network Daemon (Debian/Ubuntu instructions)
-
Install the eHSM Daemon:
sudo dpkg -i ehsm-daemon-1.0.deb sudo systemctl daemon-reload sudo systemctl enable ehsmd.service -
Configure the eHSM Daemon:
The package will install a configuration file to /etc/ehsm, open the ehsmd_config file with an editor and fill in the eHSM serial number where indicated (you can copy it from the eHSM Manager device info screen). The config file should look like this:
EHSMD_OPTS=-d <devicesn> -p 4433 -i ehsm1.ellipticsecure.com -key /etc/ehsm/key.pem -crt /etc/ehsm/cert.pem -ca /etc/ehsm/ca.pemPlease note that the bind address (specified in the -i option ) should match that of the DNS/IP address provided in the certificate request, otherwise the TLS connection will fail with a verification error.
Ensure that the port (specified in the -p option) is open on the firewall.
Copy the certificate received (from step 2 above) to /etc/ehsm/cert.pem and the key file (from step 1 above) to /etc/ehsm/key.pem.
Ensure that the key file is only readable by the root user (ie. 600).
-
Start the eHSM Daemon:
sudo systemctl start ehsmd.service -
You can check the status of the network daemon by doing the following:
sudo systemctl status ehsmd.serviceThe output should look something like this:
  ehsmd.service - eHSM Network Daemon
    Loaded: loaded (/etc/systemd/system/ehsmd.service; enabled; vendor preset: enabled)
    Active: active (running) since Mon 2018-12-17 15:05:39 SAST; 2h 22min ago
  Main PID: 731 (ehsm-daemon)
     Tasks: 1 (limit: 4915)
    CGroup: /system.slice/ehsmd.service
            └─731 /usr/sbin/ehsm-daemon -d EB30D43FF401 -p 4433 -i ehsm1.ellipticsecure.com -key /etc/ehsm/key.pem -crt /etc/ehsm/cert.pem -ca /etc/ehsm/ca.pem

 Dec 17 15:05:39 ubuntu systemd[1]: Started eHSM Network Daemon.